Sunday, September 30, 2018

Paint Desktop Version

f you’re running several copies of Windows 10 on multiple computers and in virtual machines like I am, it’s nice to have the Windows version painted onto the desktop automatically. Windows 10 has a registry key that enables you to add this to your desktop automatically. Navigate to the following key:
HKEY_CURRENT_USER\Control Panel\Desktop

Find PaintDesktopVersion under the Desktop key and change the value from 0 to 1. Next time you login, you’ll see the Windows 10 version number and build number as shown above.

Wednesday, September 26, 2018

                     Confirm File Delete Dialog

 Another missing feature in Windows 10 is the confirm file delete dialog we were all so familiar with. I never noticed it too much, but when I first deleted a file in Windows 10, I was shocked to see that the file just went straight to the recycle bin. I’m sure I’ll get used to it eventually, but if you really want it back, here’s how to get it back. Navigate to the following registry key:

 HKEY_CURRENT_USER\Software\Microsoft\Windows\CurrentVersion\Policies\

 Go ahead and create a new key under Policies called Explorer. Then create a new DWORDvalue and give it a name of ConfirmFileDelete. Change the value to 1 if you want the delete file dialog and 0 if you don’t want it. Sweet!

Configuring Windows 10 to notify user when update

How to create a Dual-Boot Windows 10 installation USB drive

How to create a Dual-Boot Windows 10 installation USB drive

Do you dual-boot between the Stable and Insider builds of Windows 10? Would you like a flash drive that could boot and install both versions of Windows 10? Well, this tutorial will show you how to make that happen. All you have to do is follow the steps below. I'm sorry if you're already really familiar with some of the steps, I just want this tutorial to be useable (and understandable) by as many users as possible. Let's get started, shall we?
  1. Choose a flash drive (preferably blank, and at least 16 GB in capacity).
  2. If it's blank already, please go to step 6.
  3. If it's not blank, please go to step 4.
  4. Backup any important files on your flash drive.
  5. After backing up your files, quick format the flash drive.
  6. Download Easy2Boot from http://www.easy2boot.com/download/ .
  7. Unzip the download to a folder in your Downloads forlder or on you Desktop (recommended folder naming: E2B or Easy2Boot).
  8. Go to the folder and run the "Make_E2B_USB_Drive_(run_as_admin).cmd" file.
  9. Now go and download the Windows 10 ISO files you need.
  10. For the stable (consumer or RTM version) of Windows, you'll need to grab a copy of the Windows Media Creation Tool from http://go.microsoft.com/fwlink/?LinkId=691209 .
  11. After the tool is downloaded, run it. You'll see a UAC prompt, requesting administrative privelieges.
  12. Select the "Create installation media for another PC" option.
  13. Select the appropriate options under Language, Edition, and Architecture.
  14. Select the option to download to an ISO file.
  15. You will be prompted to save it. Feel free to save it wherever is most convenient (although I would recommended placing on the Desktop, where it's easy to find).
  16. You'll see a download progress statement.
  17. After downloading the files, the tool will prepare your ISO file.
  18. After preparations finish, click Finish (since we won't be burning the file to a DVD).
  19. For the Insider Preview build, go to insider.windows.com .
  20. You'll be prompted to log in with your Microsoft account.
  21. If it's already registered, you can skip the next step.
  22. Join the program, if you aren't already a member.
  23. After logging in, scroll down to "The Best Windows yet is here".
  24. Underneath the "Get Windows 10" button, there is a link to go directly to the latest build. Go there.
     25. As of right now, both the Insider and Consumer builds are the same, so you will receive the same page as you went to in step 10, from the Insider link. I will update this tutorial once new Insider ISOs are available.
  25. Once the files are downloaded, make copies and then drag-and-drop the copies to the _ISO\WINDOWS\WIN10 folder.
  26. Once the files are copied and you're sure they're in the appropriate location, go to the root directory of the flash drive and run the "MAKE_THIS_DRIVE_CONTIGUOUS.cmd" file, to make the drive bootable.
    This tutorial is not Windows-only; it can be used with Linux and DOS ISOs as well, so this could be used to create a Swiss Army knife disc, that boots from Windows 10/8.x/7/Vista/XP, Ubuntu/Fedora/Linux Mint/openSUSE/Mandriva/any Linux distro, as well as tool-based/recovery distributions, so your flash drive could become the ultimate Windows repair disk with this tutorial.

Monday, September 24, 2018

COMMON FTP ERROR CODES

COMMON FTP ERROR CODES


# Description

110 Restart marker reply. In this case, the text is exact and not left to the particular implementation; it must read: MARK yyyy = mmmm where yyyy is User-process data stream marker, and mmmm server's equivalent marker (note the spaces between markers and "=").

120 Service ready in nnn minutes.

125 Data connection already open; transfer starting.

150 File status okay; about to open data connection.

200 Command okay.

202 Command not implemented, superfluous at this site.

211 System status, or system help reply.

212 Directory status.

213 File status.

214 Help message.On how to use the server or the meaning of a particular non-standard command. This reply is useful only to the human user.

215 NAME system type. Where NAME is an official system name from the list in the Assigned Numbers document.

220 Service ready for new user.

221 Service closing control connection.

225 Data connection open; no transfer in progress.

226 Closing data connection. Requested file action successful (for example, file transfer or file abort).

227 Entering Passive Mode (h1,h2,h3,h4,p1,p2).

230 User logged in, proceed. Logged out if appropriate.

250 Requested file action okay, completed.

257 "PATHNAME" created.

331 User name okay, need password.

332 Need account for login.

350 Requested file action pending further information

421 Service not available, closing control connection.This may be a reply to any command if the service knows it must shut down.

425 Can't open data connection.

426 Connection closed; transfer aborted.

450 Requested file action not taken.

451 Requested action aborted. Local error in processing.

452 Requested action not taken. Insufficient storage space in system.File unavailable (e.g., file busy).

500 Syntax error, command unrecognized. This may include errors such as command line too long.

501 Syntax error in parameters or arguments.

502 Command not implemented.

503 Bad sequence of commands.

504 Command not implemented for that parameter.

530 Not logged in.

532 Need account for storing files.

550 Requested action not taken. File unavailable (e.g., file not found, no access).

551 Requested action aborted. Page type unknown.

552 Requested file action aborted. Exceeded storage allocation (for current directory or dataset).

553 Requested action not taken. File name not allowed.
 

Sunday, September 23, 2018

Download Windows 7 Applications

Download Windows 7 Applications

Here you can download some of the Windows 7 Applications that have been created by experts and would enrich your Windows 7 Desktop Experience.

 Windows 7 USB/DVD Download Tool Allows you to create a bootable USB drive to install Windows 7. It also allows you to create bootable DVD.
http://store.microsoft.com/Help/ISO-Tool
Download Link: https://download.microsoft.com/download/C/4/8/C48F6E20-FE20-41C6-8C1C-408FE7B49A3A/Windows7-USB-DVD-Download-Tool-Installer-de-DE.exe


Set Ctrl+Alt+Del Options in Windows 7

Set Ctrl+Alt+Del Options in Windows 7


Ctrl+Alt+Del have been one of the rescue Key combos since the Windows Evaluation. And during succession of Windows it has changed the offers and functionality it provides to user.

In Windows 7 Ctrl+Alt+Del combo gives the following option
 Change Password
 Lock Computer
 Task Manager
 Logoff
 Start task Manager

However restrictions can be made on the above features using Group Policy Editor Setting. This setting may

 Prevent users from locking the system
 Prevent users from changing their Windows password on the Windows Security dialog box (which appears when you press Ctrl+Alt+Del).
 Prevent users from starting Task Manager
 This setting disables or removes all menu items and buttons that log the user off the system.

Steps to disable any of the features:

 Open Run Dialogue Box (Win + R) and type gpedit.msc
 Navigate to Local Computer policy > User Configuration > Administrative Templates > System in left hand side pane.
 Select Ctrl+Alt+Del Options setting
 Select any of the setting you want to enable from right side pane. (Enabling a setting means disabling the feature)
 Open it and enable it.
 Press OK

Rename Admin account in Windows 7

Rename Admin account in Windows 7


Sometimes in the Computer/Laptop, Windows is installed already with default Username already set. For users who are not satisfied with this and need to change this can do this using Group Policy Editor. :
1. Open Run Dialog Box.
2. Open the Local Security Policy editor using “secpol.msc”.
3. Navigate to the tree Structure In the left pane, in Local Policies, expand it to Security Options.


4. In the right pane, there is a Policy, Accounts: Rename administrator account, Double click over it.
5. Change the name of Admin account to the one you wish to have now.
6. Close the Local Security Policy window, Log off to save the changes.


Remove Recycle bin in Windows 7

Remove Recycle bin in Windows 7

Recycle bin from Windows 7 Desktop can easily be removed.
Methods to remove Recycle Bin from Windows 7 Desktop:

1. Remove from Control Panel

Navigate to following address: Control Panel > All control Panel Items > Personalization
On left side pane Click on Change Desktop Icons
This would popup Desktop Icon Settings
Uncheck Recycle Bin
Press Ok to Remove Recycle Bin with immediate effect.

How to disable restrict USB/Flash Drive in Windows 7

How to disable restrict USB/Flash Drive in Windows 7

Recently one of my friend asked me how a USB drive can be disabled on a particular computer. So it‟s a pretty much Registry Tweak.

To disable the access to USB port, in windows XP, Vista and Windows 7:
1. Click Start, and then click Run.
2. Type regedit, and then click OK. (Or simply open registry)
3. Navigate to the following registry key: HKEY_LOCAL_MACHINE\SYSTEM\CurrentControlSet\Services\UsbStor
4. In the right pane, double-click Start.
5. In the Value data box, change its value to 4, which was 3 and then click OK.
To re-enable a disabled port:

1. Click Start, and then click Run.
2. Type regedit, and then click OK. (Or simply open registry)
3. Navigate to the following registry key: HKEY_LOCAL_MACHINE\SYSTEM\CurrentControlSet\Services\UsbStor
4. In the right pane, double-click Start.
5. In the Value data box, change its value to 3, which you changed to 4 to disable the USB drive and then click OK.
6. Quit Registry Editor.

Now whenever a user will attach a USB storage device which is already installed in system, Windows will not detect it and it‟ll not be shown in My Computer. However, disabling USB ports totally also disables the ability for Windows to use USB based keyboard, mouse, webcam, printer, scanner and etc., which are common devices for a computer nowadays and essential ones as well.


Saturday, September 22, 2018

Avast! Free Antivirus

Install Avast! Home Edition on Windows 7:


Avast! Home Edition is one of the most popular free antiviruses on the market today. Many people debate whether it is better than Avira or AVG Free (less about AVG Free these days). The important thing to take from this part of the Faster 7 series is that Avast is a powerful free antivirus that will protect your computer adequately. With all of the freeware versions of software out, there is no reason to purchase an antivirus when you are using it for personal (rather than commercial) use.

1. Download Avast! Home Edition through the following link:
https://install.avcdn.net/iavs9x/avast_free_antivirus_setup_online_a2i.exe

2. Click ‘Run’ to run the installer.
3. Make sure to agree to the terms of service.
4. That’s it!
Installing Avast is just like installing any other piece of antivirus or regular software you have installed before.  This software will protect you from viruses, but we will be going over a different piece of software in the upcoming videos which will show you how to remove spyware and adware from your machine.  Stay tuned!

 Optimize, Scan and Register Avast! Free Antivirus


Avast! Free Antivirus is one of the most popular anti-viruses on the market today.  Remember, that just because it is one of the most popular it doesn’t mean it is the “best”.  I make assumptions when walking users through these videos – one of them being that they would prefer ease of use and less intrusiveness over a little bit better protection.  Avast! Free Antivirus’ settings can be modified to give very few instructions or intrusiveness.

Scanning and Registering Avast! Free Antivirus is extremely easy.  Many people get intimidated by the word “Register” because they think there will be credit cards and authenticity required.  The Avast software only requires that you enter your Name and E-mail address… that’s it!  You don’t even need to go to your e-mail and grab a CD-Key when it is done, it registers on its own.

Disable Notifications on Avast! Free Antivirus


1. Open Avast! Free Antivirus

2. In the summary page, look for the section in the middle titled “Silent / Gaming Mode”
3. Select the “Turn on” button.
4. Choose the option “Turn on Permanently”

Scan Your Computer with Avast! Free Antivirus


1. Open Avast! Free Antivirus

2. Select ‘Scan’ From the Left Navigation
3. Click ‘Start’ on the Right Hand Side of ‘Full System Scan’

Register Avast! Free Antivirus


1. Open Avast! Free Antivirus

2. Select ‘Maintenance on the Left Navigation
3. Select ‘Registration’ on the Left Navigation
4. Select ‘Register Now’
5. Enter your Name and E-mail Address
6. Select’ Register’ under “Stay with Avast! Free Antivirus”
7. Enter your Name and E-mail address
8. Select “Register for Free License”
9. That’s it!

Create a System Restore Point in Windows 7:

Create a System Restore Point in Windows 7:


Creating a system restore point is essential when starting to modify system settings on your computer.  This will give us added insurance when it comes undesirable issues occurring.  It is unlikely that you will need to recover from any of the steps I will be putting out in the Faster 7 series.  If any of the steps cause you problems you can typically revert them back to the old settings.

1. Right Click on ‘My Computer’
2. Select ‘System Protection’
3. At the bottom of the system protection dialogue, click ‘Create…’
4. Name the restore point “PCMichiana Faster 7 Video Series’
5. Click ‘Ok’
6. Wait for the restore point to be created.
That’s all there is to it!  As always, if you have questions feel free to swing by the forum and post them there.  Stay tuned to the Faster 7 series as it will walk you through most of the best tweaks for Windows 7 out there.

Windows 7 Registry use

 Change the Width of Taskbar Buttons 
Windows 7 is set up to always combine Taskbar buttons from the same program and never display their labels. If, however, you’ve changed the setting to either not combine the windows at all or to only combine them when the Taskbar is full, you can change the icons’ width to hide the labels there, too. Here’s how.
1. Navigate to HKEY_CURRENT_USERControl PanelDesktopWindowMetrics
2. Scroll to find the “MinWidth” entry. If it’s not there, you’ll have to create it yourself. Right-click in the right pane, select New, then Select “String Value,” and name the object MinWidth.
3. Double-click MinWidth to open it.
4. Change the number in the “Value Data” field the width you want to allot to the icons. With the default small buttons, 38 is sufficient; with the larger icons, you’ll want about 52.
5. Click OK.

Windows 7 Registry Hacks

1. Change Your Logon Screen Background
Changing the wallpaper on your desktop is one of the easiest things to do in Windows. But if you can have that display any image you want, why not do the same with your logon screen?
1. Navigate to HKEY_LOCAL_MACHINESoftwareMicrosoftWindows
CurrentVersionAuthenticationLogonUIBackground.
2. Find the “OEMBackground” key; or right-click in the right pane and select “New,” then “DWORD (32-bit) Value” to create it (and then give it that name).
3. Double-click on “OEMBackground” to open it.
4. Change the value in the “Value data” field to 1.
5. Click OK.
6. Using Windows Explorer, navigate to your Windows directory, then System32oobe. If there’s a folder in here called “info,” go into it; if there’s a folder inside of that one called “backgrounds,” go into that. If neither exists, you’ll need to create them both first.
7. Copy the image (it must be a JPEG, and smaller than 256KB in size) you want to use as your logon screen background into the infobackgrounds folder. 
8. Rename the image backgroundDefault.jpg. (Note: If you choose an image that’s sized differently than your desktop and you change your resolution, it will be adjusted to fit—with a possible loss in quality. The infobackground folder also supports 12 other files of specific resolutions. The files should be named backgroundXXXXX.jpg, where the XXXXX is one of the following: 900×1440, 960×1280, 1024×1280, 1280×1024, 1024×768, 1280×960, 1600×1200, 1440×900, 1920×1200, 1280×768, or 1360×768. For example, background1920x1200.jpg will be used at 1,920-by-1,200 resolution, and so on.)
The next time you restart your computer, or log out, you’ll see this image as the new logon screen. If you chose an image that prevents the buttons and text from looking their best on the logon screen, you can adjust their appearance as well.
1. Navigate back to HKEY_LOCAL_MACHINESoftwareMicrosoftWindows
CurrentVersionAuthenticationLogonUI (you’re not going into Background this time).
2. Add a DWORD value called “ButtonSet.”
3. Change its value to either 1 (darker text shadows and lighter buttons, intended for lighter backgrounds) or 2 (no text shadows and opaque buttons, for darker backgrounds); 0 is the Windows default.


2. Personalize the IE8 Title Bar
If you use Internet Explorer 8 in Windows 7, you’re probably familiar with the browser’s title bar, which appends “Windows Internet Explorer” to the end of every page name. Why not change it to something a little more… you?
1. Navigate to HKEY_CURRENT_USERSoftwareMicrosoftInternet ExplorerMain.
2. Right-click in the right panel, click “New,” and then select “String Value.”
3. Name the string value you just created “Window Title” (space included).
4. Double-click on Window Title.
5. Type your personalized title in the “Value data” field.
6. Click OK.

Friday, September 21, 2018

Create Invisible & Color Folder

You always heard about a wihout name folder but you don’t know how to create it .Now I create invisible folder with two tricks .

Create Invisible Folder

  • First you create a folder .
    • Then press Window Key +R ,Run is open now you type charmap , For giving this command your character map is open.
    • In search box you type    U+2001:Em Quad     and then select it.
    •  


 Right click on your folder and then click on rename it, and paste you select character


Now you just create a wihout name folder.

short from

You create a folder and rename it and hold down Alt key and press 0160 (numlock on)

Color  your Folder

You can create your color folder wih this software  Folder Colorizer


16 Windows 10 tricks you’ll wish you knew sooner

1. A whole new start (menu)

The start menu is a Windows classic. It’s easily accessible through the stylized Windows icon in the corner of your screen. Click on it, and you get a layout of your most-used programs, access to power options, and shortcuts to your file explorer and computer’s settings. Change the start menu’s appearance when you right-click on the icon instead. If you’re using a touchscreen, then just touch the icon, hold it down for a second and then release.
Alternatively, use a keyboard shortcut by hitting the Windows key. Right-clicking the Start icon delivers a quick and clean menu. The access to programs is still there, but it also puts a lot more at your fingertips including the Task Manager, Control Panel, Device Manager, and even the trusty Command Prompt. You can also access this advanced menu by hitting the Windows key + X.

2. Disk cleanup

Remember disk cleanup? It was a way to make your computer run faster when PCs had less storage than they do today. Disk Cleanup fell by the wayside for most of us as PCs and laptops have become more sophisticated. But your computer could still use a de-bloating now and again.
Disk Cleanup is a simple way to delete files and to ensure your Recycle Bin is cleared out. On Windows 10, type “disk cleanup” into your taskbar where it says, “Type here to search” >> Click on Disk Cleanup app >> Put a check mark next to each folder you want to be deleted, such as temporary files.

3. Malware removal

It’s more important than ever to have a multilayered approach to cybersecurity. Windows Defender is a security tool that can be set up to block malware attacks in real time or you can perform a scan when you need it.
To make sure it’s on, type “Windows Defender” into your taskbar >> Select Windows Defender app >> Make sure Real-time protection is on.


 4-Find missing or corrupted files

Remember this: cmd. It’s a command prompt that can help you find files that your Windows operating system needs to work properly. It can also help you fix problems.
Type “cmd” into the taskbar >> Right-click on Command Prompt >> Select Run As Administrator. To find missing or corrupted files, type “sfc /scannow.” To check for disk problems, type “chkdsk /f.”


Wednesday, September 19, 2018

How to Increase the Size your Hard Disk Space up to 2TB in Window 10

ncrease the Size of your Window Hard Disk up to 2TB from Creating Virtual Disk feature in Window 10. With this trick, you can create Fake Hard Disk in your Computer with 2TB Size.


                                      Increase the Size of HardDisk in Window 10

1. Search Disk Management in Window Search Box and select Create and format hard disk partitions.

2. Now you see Disk Management dialog box in your screen. Select Action in the menu bar and click on Create VHD in your Computer.


                                               Create Virtual Disk in Window 10
3. Now a new dialog box appears in your screen. First click on browse and make a .vhd file in any of your drives. Select GB  and put 1999 value in the box. Make sure you select Dynamically expanding option and click on OK button.
                                   Create VHD File in Disk in Disk Management in Window 10

4.  Select Disk 1999GB, Right- Click on it and choose Initialize Disk. 
                                                  Initialize Disk in Window 10

5. In this box all things are already right, just click on OK button.
                                                Initialize Disk in Window 10
6. Right Click on 1999 GB Unallocated Drive and select New Simple Volume. 


                                               New Simple Volume in Window 10
 
Now You see 2TB Virtual Hard Disk in Window 10 from File Explorer.


Friday, September 14, 2018

Unlock Window Computer from Android/iPhone Smrtphone (Two Way Authentication)

There are many benefits for using this security method in your PC.
  • Use Your iPhone/Android as a authentication key for login in PC.
  • Add extra layer of security in your Windows/Mac PC.
  • Don’t need to remember your complex passwords.
  • Turn your smartphone/mobile into an electronic key.
  • Works with your WiFi and LAN
  • Two Factor Authentication.
How it works
Open the App and touch the Name of your PC and your desktop unlock without entering password. If WiFi network is not available then phone displays QR-Code on the screen that is scanned by PC camera.

Steps for Using ROHOS Login Software in Windows/Mac Desktop with the help of Android and iPhone.

Also Read: Best Way to Lock your Phone
Amazing Things You Can do with your Android Phone Lock Screen
How to Unlock Bypass or Remove Android Pattern from 3 Ways
Please note your computer and phone should be connected to the same WiFi/LAN network in order to be able to connect each other.


Download Rohos Login 
Install Rohos Logon Key on your Windows or Mac :

Download for Windows | Download for Mac OS X
Download for Android. Install Rohos Logon mobile on your Android phone
Download for iOS, Install Rohos Logon mobile on your iPhone/iPod.

  1. Download and install Rohos Login for Your Window/Mac PC.
  2. Open ROHOS Software in your pc and select “Options” (1 in Picture).
  3. Choose type of Authentication “Mobile Phone (Android/iPhone)” and press ok button.
  4. (2 in screenshot) Select “setup a key ” and type the PIN you want. 
5 When you finish type your PIN ,ROHOS give you QR Code for scan.
 6- Download ROHOS Mobile app in your Android/iPhone.
7- Scan the QR Code from ROHOS app and you see your PC Name in ROHOS Mobile like below picture
 8-Now you complete the setup.

How to Change Default DNS to Google DNS for Fast Internet

  1. Go to the Control Panel.
  2. Click Network and Internet > Network and Sharing Center > Change adapter settings.
  3. Select the connection for which you want to configure Google Public DNS. For example: \
    • To change the settings for an Ethernet connection, right-click Local Area Connection >Properties.
    • To change the settings for a wireless connection, right-click Wireless Network Connection >Properties.
  4. Select the Networking tab. Under This connection uses the following items, select Internet Protocol Version 4 (TCP/IPv4) or Internet Protocol Version 6 (TCP/IPv6) and then clickProperties.
  5. Click Advanced and select the DNS tab.
  6. Click OK.
  7. Select Use the following DNS server addresses. If there are any IP addresses listed in thePreferred DNS server or Alternate DNS server, write them down for future reference.
  8. Replace those addresses with the IP addresses of the Google DNS servers:
    • For IPv4: 8.8.8.8 and/or 8.8.4.4.
    • For IPv6: 2001:4860:4860::8888 and/or 2001:4860:4860::8844. 
      Restart the connection you selected in step 3.

How to Change Window 7 and 10 Computer Password without Knowing Old Password

Now you can change any Window PC password without knowing old password with the help of two methods one from CMD and second from Window settings.

Tuesday, September 11, 2018

How to Backup and Restore Drivers on Windows 10

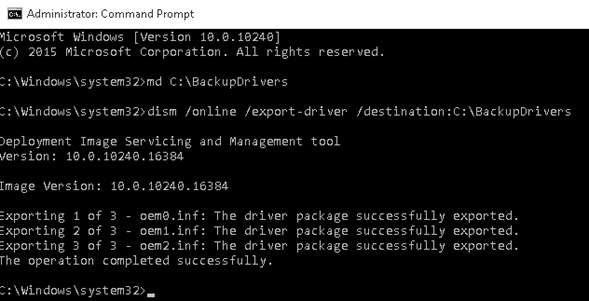
Using DISM.exe

Well, we can also use Deployment Image Servicing and Management utility to backup drivers on our Windows 10 computer. Latest we can restore then using the Device manager.

Step 1. First of all, you need to open CMD with adminstrator privileges on your Windows computer.
Step 2. Now you need to create a directory where you want to save the drivers. For that you need to enter command
md C:\BackupDrivers
Step 3. Now you need to enter the command:
dism /online /export-driver /destination:C:\BackupDrivers
 Step 4. Now open the newly created folder and there you will see the drivers. The folder will also show you the related files like *.sys, *.dll, *.exe etc.

Step 5. Now in order to restore the driver that you have created from the backup you just need to open the Device manager and then right click on the device in which you want to install the driver.
Step 6. Now you just need to select the option ‘Update Driver Software’
Step 7. In the next step, you need to select ‘Browse my computer for driver software’ and then select the directory where the backup copy of the driver is stored.
 That’s it, this is how you can use DISM.exe and Device manager to backup and restore Drivers on your Windows computer.